
Recording DOS gameplay footage with DOSBox and FFmpeg
Every once in a while I feel the urge to embark on a nostalgic time travel by playing a good old game from an era where MIDI music, distorted renditions of 8-bit speech and paletted 256 color graphics with pixels the size of your thumbs were considered a stunning rendition of an immersive gaming environment. Surprisingly, running old PC games on today’s hardware is a lot less tedious than the horrifying experience that was getting them to load on an actual DOS machine, the platform that they were actually designed for. In the good old days, providing games with all the drivers they need while still keeping enough memory free for them to actually load was an effort that really made you appreciate the first glimpse at the each game’s title screen. Nowadays, all you need is an instance of DOSBox, which emulates an entire x86 hardware stack complete with drivers and memory managers for its bundled DOS implementation.
When trying out DOSBox, one feature I immediately fell in love with, is its ability to record videos of your retro gaming sessions. This way you can preserve and share the glory of your best gameplay moments without ever having to go relive the pain of achieving them again – because let’s face it, games back then were hard. Unfortunately, the sharing part requires a bit of manual work if you want the videos to play on a wide range of systems. That – together with a general interest in how common video codecs handle retro game imagery – made me write this how-to.
Recording gameplay videos
By default, DOSBox’ video capturing feature is triggered by pressing
Ctrl-Alt-F5 simultaneously. Unfortunately, if you’re running
Linux or another Unix based system with X11 and virtual text consoles, this key
combination will never reach DOSBox, as it will typically get intercepted by the
X server and drop you to the 5th text console (tty5) instead. The
easiest way to get around this is to remap the video capturing feature to
another key combination. This can be done via the DOSBox key mapper, which is
started from within DOSBox by pressing Ctrl+F1 (works only if the
DOSBox window has mouse capture enabled) or by running DOSBox with
dosbox -startmapper.
 DOSBox’
keymapper
DOSBox’
keymapperOn my keyboard, “mod1” corresponds to Ctrl and
“mod2” to Alt, so I have chosen to remap the audio
recording feature (“Rec Wave”) from Ctrl-F6 to
Ctrl-Alt-F6 and video capturing (“Video”) from
Ctrl-Alt-F5 to Ctrl-F6. Now, whenever I press
Ctrl-F6, DOSBox will start recording the current video and audio
output to a new AVI file – named after the executable that is currently
running within DOSBox – which is written to its capture directory (on my
system, the default directory is ~/.dosbox/capture, but of course
this can be changed in DOSBox’ configuration file). Recording can be
stopped by pressing the same key combination again.
Playback
Closer inspection of the generated AVI files reveals that videos captured by DOSBox use ZMBV (ZIP Motion Block Video), a lossless video codec that can efficiently encode the paletted low-color graphics that are typical for the various video modes used by DOS games and applications. Audio is also stored losslessly in an uncompressed PCM wave format. As long as you have not enabled frameskipping, video will be recorded at a framerate of 70.086 fps, which matches the maximum VGA refresh rate. So in short, you get a losslessly compressed, faithful recording of what was going on in your DOSBox session, but how do you play it back?
Fortunately, ZMBV is directly supported by FFmpeg, so any media player that uses libavcodec (FFMpeg’s codec library) should be able to play the captured videos out of the box. That covers MPlayer, VLC and many others. People running DOSBox on Windows may want to install the ZMBV codec that comes bundled with the Windows version of the DOSBox redistributable.
If you are using one of DOSBox’ pixel art scalers in order to avoid having to play the games in their original resolutions, you’ll notice that any enabled scalers or filters are not applied to the recordings. Even though this makes sense from a technical standpoint, as you can always apply scaling as a post-processing step, watching these videos at fullscreen resolutions will usually mean that the video player will have to scale the video up from resolutions as low as 320×200. Since by default most video players use scaling algorithms that are more suitable for real-life footage than for low-color high-frequency content like pixel art, the result will usually not look very good. If the player uses bilinear or bicubic interpolation, the scaled video will appear blurry and might even be stretched in case the game was using a video mode with a non-square pixel aspect ratio.
Transcoding to other video formats
As mentioned before, ZMBV is very well suited for the kind of graphics that DOS games typically generate. But in addition to the playback issues outlined above, this codec is also not widely spread, so transcoding to more popular video codecs is almost inevitable if one intends to edit or share the captured game content.
In the following section I’ll discuss a few issues you’ll probably run into when trying to transcode the videos created by DOSBox to mainstream video codecs such as H.264/MPEG-4 AVC or VP8.
Upscaling pixel graphics
Most mainstream video codecs are designed for real-life footage with regards to the set of techniques they employ to limit the required bandwidth without too much loss in perceivable quality. Unfortunately, what works well for camera footage does not necessarily produce good results when applied to pixel graphics. One method in particular, known as chroma subsampling, has a very noticeable effect when applied to low-resolution pixel graphics. Basically, when chroma subsampling is used, color information is stored at a lower resolution than brightness. Since pixel graphics usually feature high pixel-to-pixel color-contrast, chroma subsampling results in a smudgy appearence when applied directly to low-resolution gameplay footage. If chroma subsampling cannot be avoided (because the video codec or profile demands its use), one can compensate for the lower color resolution by increasing the video resolution before encoding. Upsampling the footage using a suitable interpolation algorithm – like nearest neighbor interpolation –, will also reduce the blur introduced by zooming the video in a player that performs bilinear or bicubic interpolation.
The following image shows a cropped portion of a single frame from 3 differently scaled versions of the same source video. During transcoding, the video was resized from its original resolution (320×200 with a pixel aspect ratio (PAR) of 1.2) to three different output resolutions using nearest neighbor interpolation: 320×240 with a PAR of 1, 640×480 with a PAR of 1 and 640×400 with a PAR of 1.2. Then, it was zoomed to a fullscreen resolution of 1280×960 by the video player during playback.
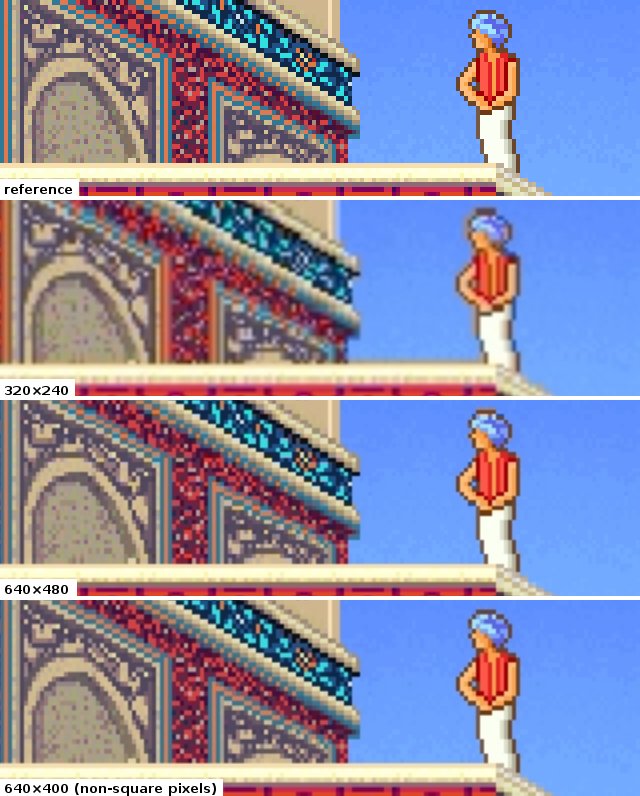 A cropped screenshot of Prince
of Persia 2 zoomed to a 4:3 screen resolution of 1280×960. The image
illustrates the effect of using different scaling parameters during transcoding
on the final, zoomed video output. All videos are upscaled using nearest
neighbour interpolation and then zoomed to screen resolution using a video
player that uses linear filtering.
A cropped screenshot of Prince
of Persia 2 zoomed to a 4:3 screen resolution of 1280×960. The image
illustrates the effect of using different scaling parameters during transcoding
on the final, zoomed video output. All videos are upscaled using nearest
neighbour interpolation and then zoomed to screen resolution using a video
player that uses linear filtering.Due to the nature of nearest neighbour interpolation, increasing the vertical resolution introduces duplicate vertical lines. This is very visible where the video was scaled from 320×200 to 320×240 (note the irregularities in the diagonal lines as well as the top of the Prince’s turban). The same effect is still somewhat visible in the video that was scaled to 640×480, but it is a lot more subtle. Both the 320×240 as well as the 640×480 video show artifacts caused by the 4:2:0 chroma subsampling performed during encoding. While the former is simply missing a lot of the necessary chroma information (since chroma is stored at just 160x120), the latter features a sufficiently high chroma resolution (320×240), but suffers from vertical misalignment due to the non-uniform stretching from a PAR of 1.2 to a PAR of 1. Better results can be achieved by uniformly scaling the image and setting an appropriate pixel aspect ratio so that the video player can do the necessary stretching. On the other hand, using non-square pixels causes problems with certain video editing software, so the difference in quality between the last two examples might be acceptable if you plan to embed your video in a bigger project.
Frame rate conversion
As mentioned before, DOSBox captures videos at the maximum VGA refresh rate of approximately 70 Hz, even though most DOS games perform at a frame rate that is considerably lower. Since hardware players often expect their videos to be recorded at a standard broadcast frame rate (24, 25, 29.97 or 30 fps), it might make sense to reduce the frame rate during transcoding for the sake of compatibility. Depending on the game you were capturing and the output frame rate you are aiming for, this step might introduce a certain amount of stuttering. In order to keep that to a minimum, the examples provided below use the highest standardized output frame rate, which is currently 30 fps.
Transcoding to H.264 / MP3 using FFmpeg
The following FFmpeg command line will apply the changes discussed above
while converting the input file (a 320×200 ZMBV/PCM video aptly named
in.avi) to H.264 with MP3 audio stored in the MP4 file
out.mp4:
ffmpeg -i in.avi \
  -sws_flags neighbor+full_chroma_inp -s 640x480 -r 30 \
  -vcodec libx264 -vpre slow -vpre baseline -crf 20 \
  -acodec libmp3lame -aq 2 \
  -f mp4 out.mp4
Setting the parameter sws_flags, which controls the software
scaler, to neighbor+full_chroma_inp lets the scaler perform
nearest neighbor interpolation and forces it to take the full input chroma
resolution into account (the output video will still use chroma subsampling, but
the input does not). We set the output size with -s 640x480 and the
output frame rate with -r 30. The line -vcodec libx264 -vpre
slow -vpre baseline -crf 20 determines the video encoder
(libx264), configures it with two presets (slow and
baseline) and sets the constant rate factor, an image quality
setting, to 20, which should give a reasonably good looking output
video. Audio is set up with -acodec libmp3lame -aq 2, resulting in
a decently sounding, variable bitrate mp3 stream. Finally, everything is muxed
together into an MP4 file called out.mp4 with -f mp4
out.mp4.
If you would like to scale the video uniformly, you can set up a custom
display aspect ratio as follows (note the change of the size parameter and the
addition of -aspect 4:3:
ffmpeg -i in.avi \
-sws_flags neighbor+full_chroma_inp -s 640x400 -aspect 4:3 -r 30 \
-vcodec libx264 -vpre slow -vpre baseline -crf 20 \
-acodec libmp3lame -aq 2 \
-f mp4 out.mp4The resulting video will have a storage aspect ratio (SAR) of 16:10, but a display aspect ratio (DAR) of 4:3. So instead of vertically stretching the video prior to encoding, the player will perform the necessary scaling on demand.
For more information on FFmpeg or the numerous codec-specific options and presets, please consult the FFmpeg documentation as well as the short, but helpful x264 encoding guide by Robert Swain.
That’s it for now!
I hope this little how-to proved helpful to you and I’m – as always – open to suggestions and/or questions. Let us preserve the glory of all those ancient games with high-quality footage of their best (and worst) gameplay moments.
LunaVorax said...
Your article has been a huge help and it taugh me pretty much anything I wanted to know about DOSBox recording and FFmpeg processing.
It's now in my favorite, thank you so much for this!
Unknown said...